$300 DIY Kitchen Re-Skin
 |
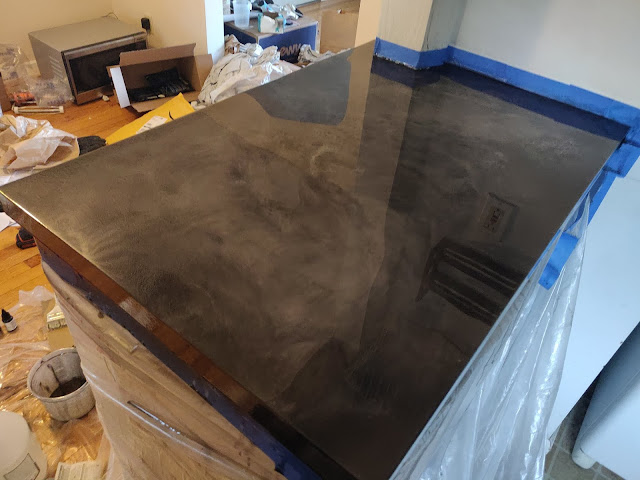
| After |
 |
| Before |
Besides painting some walls, our first endeavor in our new house was to change the look of the kitchen, without spending too much money. The laminate countertops and cabinets had a solid "meh" outdated feel and I was excited to leave my mark on the house. Normally I would be too nervous to try something like this, but I figured I couldn't make it that much worse... right??
I wouldn't go as far as to call this a kitchen remodel or makeover, since all we did was cover some stuff up. So instead I'm calling it a "re-skin". For a first DIY project and around $300, I think this came out pretty decent, though there are some things I would change if I did it again.
The plan was to:
- Cover the laminate countertop with epoxy resin
- Paint the cabinets
We didn't want to mess with the backsplash or flooring because we wanted to keep things simple and cheap for a first-time project. For the countertops, I initially wanted to replace them with stone or quartz, but when I looked into it I found that the idea was not very DIY or wallet friendly. Plus, those kinds of countertops actually require maintenance such as sealing the surface every year, and I didn't want to worry about staining, scratching, or otherwise damaging an expensive surface. After watching a bunch of youtube videos I was pretty convinced that an epoxy countertop could look good.
An epoxy resin countertop can be poured directly over your old countertops, and the materials to DIY it were only around $100 (I ended up spending over $200 because I way overestimated how much supplies I would need). Once it's cured, the surface is food safe, completely waterproof, and heat and scratch resistant. And surface imperfections like scratches can always be repaired with some sanding and a clear coat of epoxy.
For the cabinets, the more I looked at them the more the fake wood-grain laminate bothered me. It doesn't look too bad in the picture, but in person it felt pretty fake.
If I hadn't gone crazy buying supplies, and not including the cost of the orbital sander we bought, the total cost of this project would be around $300 or less! But since I didn't know what I was doing and wanted to avoid having to make a return trip to Home Depot, we spent more like $400. The supplies included:
- Stone coat countertop epoxy resin
- White and black pigment for the resin
- Spray paint in: charcoal grey, stone grey, and white
- Epoxy mixing attachment for drill
- 60 grit sandpaper
- Bonding and sealing primer
- Black paint
- Blue paint with semi-gloss finish
- Various brushes, rollers, paint sticks, and paint trays
- Painter's tape and plastic covers
I'm not 100% satisfied with the end result (it feels a little dark and very blue), but I do think the counters are a huge improvement, and overall the kitchen feels less old. Right now we are busy getting ready to move in, but some things I'll want to revisit later are:
- Repaint the upper cabinets to a lighter blue
- Add wallpaper or a tile pattern to the blank wall next to the oven
I originally wanted to paint the cabinets white to go for a clean modern black and white look, but then realized it would be hard to pull off with the yellowish backsplash and yellow/brown floor. Also, the whole house aesthetic is more comforting and cute than sleek and minimal. I chose blue to compliment the yellow in the room, but ultimately the color came out darker than I had envisioned, and kind of overpowers the backsplash. The darker color looks nice on the lower cabinets with the black countertop, but feels a bit much on the upper countertops. I do really like how the metal knobs stand out against the blue though.

Comments
Post a Comment