Check out my first furniture refinishing project! It took a lot of time mostly due to my indecisiveness, but I now decisively love how it turned out :) Long story coming up, but first, here's the before picture:

For my first furniture project, I used this coffee table that was taking up space in the office room and that I didn't really feel any attachment to. The story is, when Isaac and I moved in together, we quickly acquired an abundance of coffee tables. We moved into a completely empty apartment during the busiest moving season, and all our stuff was in storage with no way to get it out for a couple days (U-hauls were completely booked). We slept on air mattresses and ate take-out on the floor. This table was the first furniture we bought, because someone happened to be selling it on Facebook marketplace and they were only down the street. It was listed for $40, but I think we paid $35, due to Isaac's excellent negotiating skills (he looked at the intentionally distressed paint job and commented that it was damaged 😆).
The seller mentioned that it was an antique, but it didn't look that impressive and all we wanted was a surface to eat pizza off of. There was a metal plaque attached to the bottom that probably declared its authenticity, but it fell off while we were carrying it back to our place. Whoops. Also on the way back, we found a second table, completely free on the side of the road in bad (wobbly, with laminate peeling off particleboard) but usable condition. We ordered pizza, ate it off the first table, and immediately stained the light grey paint with pizza grease. Once I realized how impossible to clean the table was, we switched to the falling-apart one we got off the curb, and shoved this one in a corner to become a junk table.
Picture of the Day 1 grease stain:
We later got our stuff back from storage, including Isaac's actual coffee table that he already had. Then we went to Ikea, saw a nicer one (solid wood! cheap! big enough for board games!), and bought that too. So yeah, we have four coffee tables :p And never felt like getting rid of any of them, because we like putting junk on tables.
Flash forward, and now I care about furniture refinishing. I started watching salvaged by k. scott's youtube channel during the pandemic and felt inspired to try my own project now that I have space in the basement to do it. (I'm also really interested to find out if I can make money from a hobby like this!) I was rearranging the home office and decided there wasn't any room for this table. I remembered that it's supposedly vintage, and it feels like solid wood. I also looked closer at the paint job and concluded that it was a DIY job, so I didn't feel bad about messing with it. First of all, there's no way there was any type of top coat or protection over the paint, since the porous surface sucked the grease right out of a pizza box and held onto it for dear life no matter how hard I tried to clean it. There were also visible brush strokes on the surface with hints of the underlying wood showing through. The legs and edges had been intentionally distressed, which I know some people like, but is not a look that Isaac and I are a fan of.

So, I brought the table down to the basement, and my first mission was to somehow remove the paint and see what the wood looked underneath. Then I would make my decision from there.
My first attempt to remove the paint was to blast it with the orbital sander. I envisioned it being a really easy task, but after probably 20 minutes of working the same spot and completely wearing down a new piece of 60-grit sandpaper, the table still looked like this:
The paint was coming off very slowly and in a very fine dust, like you can see on my hand. Because I'm a super sleuth, I concluded that it was probably bare chalk paint, due to the dustiness, porosity, and DIY nature of the paint job. Chalk paint is popular among DIY furniture refinishers because of its great adhesion and matte finish.
Since the sanding wasn't working out, I ended up buying some paint stripper. Paint stripper sounds like a scary nasty chemical, so I got an "eco" brand. It ended up not being that bad. I still wore a mask and gloves when using it, but it's not like my eyes were watering. The stuff has the consistency of yogurt, and you apply it thickly and let it sit for a couple hours before scraping the paint off. I only did the top surface since I knew it would be tricky to scrape the rest of the table. I also wasn't even sure if the paint stripper would work, and didn't want to waste my time.
It ended up working like a charm! The paint peeled right off with a putty knife. It was very satisfying. (Side note: I tried the same paint stripper on another project, which had two layers of what looked like very old latex paint. That one had much less success.)
A couple minutes later and after a good wash, it was mostly bare. The remaining bits of paint I scrubbed off or did another spot application of paint stripper.
The wood looked so nice! Honestly, I love watching furniture makeover videos, but some people cover up really nice wood with boring flat paint and it makes me sad :( I think a coffee table deserves to have a good wood top.
Once the wood dried out though, it looked much lighter. Here's when I started to consider what I actually wanted the table to look like.
The light wood top would go well with the already light-colored legs, and I would also save time by keeping the bottom portion the same. But in order to match the legs, the wood needed to be just a little lighter. We have a ton of leftover white paint from when we moved in and painted the walls, so I figured I could just whitewash the top, and hopefully come out with a soft, sun-bleached wood look. Also, there were some light marks where I had spot-applied the paint stripper, and rather than figure out how to remove those, I could just camouflage them under the whitewash.
Whitewashing is when you mix equal parts white paint and water, and use it to stain wood. You brush on the diluted paint, and immediately wipe it off, leaving behind a white tint. Sounds easy right?
It didn't go well. As soon as my brush touched the surface I panicked. The white looked waaay too opaque. As in, completely opaque. Also, as I continued applying it to the rest of the surface, it was drying way too fast! I was originally going to apply the whitewash to the whole surface and then wipe it all off, for an even finish. But it was drying way too fast for that. And it was really, really white.
I went crazy trying to fix things mid-action. I added more water to the whitewash, I frantically rubbed off what I had gotten on the table, and I tried to paint-and-wipe the whole table as fast as possible, while still trying to match my brush strokes with the grain.
In the end, I guess it worked, but it wasn't really what I had imagined. The white wall paint was a pure, bright white, and even watered down, it still clashed with the grey painted legs and their distressed look.
I was kind of desperate to make this work, so I decided to sand down the whitewash to further tone down the effect and get something kind of in-between. But then the whitewash sanded off much more easily than expected, leaving me with an uneven finish. So I applied two more layers of whitewash to even things out, and sanded it again until I liked the look of it.
When I was finally done, I stepped back and took a picture. Then I looked at the pre-whitewashed picture to compare before and after. You guys. IT WAS THE SAME. I SANDED OFF LITERALLY EVERYTHING.

On the bright side though, my vigorous sanding had removed the light splotches from the paint thinner :') So at least now I know how to fix that. (And that generally, you can sand away your mistakes!) The whole whitewash ordeal took an entire day, so I took a break from the project for a while.
I still wasn't sure what I wanted the table to look like, but after seeing the grey distressed legs contrasted with a bright white top, I grew to dislike them more and more. Arguably the light-colored and distressed look above is already perfect for a farmhouse aesthetic, but I've never really loved the shabby farmhouse style. I see super distressed farmhouse furniture and want to "fix" it, lol. So instead I decided to go more modern and change up the bottom portion as well.
I didn't want to paint strip the bottom because of the curvy lines and awkward angles, so I decided I needed to paint over it a different color. And what color is the best for covering stuff up? Black! What color doesn't need a distress to look interesting? Black!
Luckily, chalk paint is easy to paint over. The difficulty in removing the old paint layer assured me that it wouldn't start to chip or peel and take any new paint with it. Since there was no top coat, there's no need to sand or prime. I bought some black chalk paint (Country Chic in Liquorice) and painted over all the grey. This color isn't pure black, it has a subtle navy undertone that somewhat softens the harshness of black. I really like it. It also comes out super matte. I've never used chalk paint before, so even though I knew it's supposed to be matte, I was still surprised. Coverage was great too -- I only did one coat, with a second pass-through just to get some spots that I missed.

This was already looking much better and more my style. The bottom half went from shabby and old to modern and interesting. I wanted to stop there because I was getting tired, and the table already felt much improved. But the light wood top contrasted a lot with the black bottom. It wasn't necessarily bad, and I personally liked it, but it definitely gave the table an edgy vibe and I wasn't sure anyone would buy it.
Onto staining the wood top. I used General Finishes pre-stain conditioner, which helps wood absorb stain more evenly, and Varathane stain in Cherry. Afterwards the table was looking a lot more balanced.
Last thing is top coat! There's no point to a coffee table that you have to treat with baby hands. And I want to protect that really nice wood finish. There's a couple of options for furniture finishes, including hemp oil, furniture wax, polycrylic, water-based polyurethane, and oil-based polyurethane. The order of that list goes approximately from most natural and non-toxic to most chemical-y, but also least to most durable. I don't like working with smelly chemicals, and the basement doesn't have great ventilation. I landed on middle ground with the polycrylic. It was hardly smelly at all (but I still wore a mask)! I did three coats on the top surface for maximum durability, and two coats on the bottom surface and legs since they wouldn't see as much use.
A downside of polycrylic is that it can sometimes dry a little milky over dark finishes, especially if you apply it too thick. I took some advice from that k. scott youtube channel and mixed it with a little bit of the black paint to help with that.
Another downside of polycrylic is that you need to be careful applying it, so it doesn't dry with visible brush strokes or drip marks. This was tricky on the lower part -- the vertical curvy legs invite the finish to drip down and pool up, and the bottom shelf is hard to reach with a brush without feeling awkward and increasing the risk of visible brush strokes. This is partly why I decided not to do a third coat. In the future, I really want to get a paint sprayer to help with even application of both paint and top coat on curvy surfaces and awkward shelves. A paint sprayer costs like $100 :')

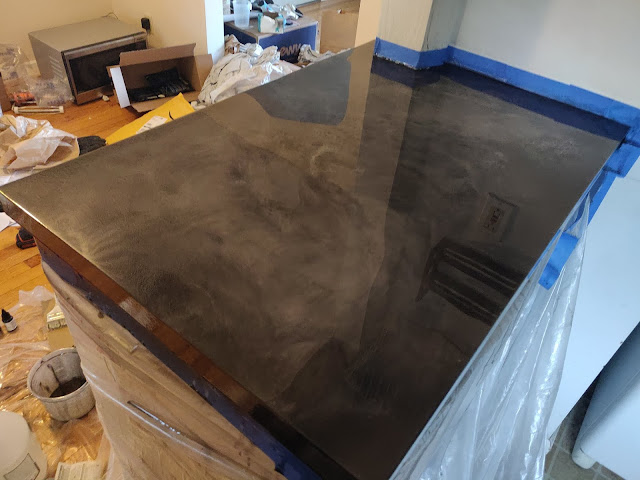
Anyway, here it is after the top coat! The top surface came out nice and glossy, but not plastic-looking. The bottom surface also took on some shine (the topcoat was "satin" finish, so I guess this is what satin means). I actually liked the matte-ness of the black paint before because it looked so unique, but the slight shine helps accentuate the curvy legs. It also makes the surface feel more finished, and not like I'm going to scratch off some paint accidentally at any moment. As you can see though, there are visible brush strokes on the bottom shelf.
As I mentioned, we don't have a good spot for this table at home, so my goal is to sell it now. Below are some staged pictures I took. Staging the shots was fun, and I got to use my lovely house plants :) I also threw in some books, because I am Very Intellectual.
I had some trouble coming up with keywords for this listing. Popular furniture keywords are: farmhouse, midcentury modern, and modern. This piece doesn't fit in any of those categories. It has the silhouette of a traditional / vintage piece, but the painted legs make it more modern-leaning. Apparently the word for something that incorporates both traditional and modern elements is "transitional". But not a lot of people know that keyword and it isn't super popular. (On the other hand, I think I've learned what kind of furniture / interior design I like, so that's cool!)
When I first started the project, I told Isaac I would consider selling for $65 (for a net $30) a win. But, the more I worked on the table, the more attached I grew to it. Also, a $30 profit would probably just cover my cost of materials. I also spent a lot more time on this than I anticipated, though I consider that time spent on a fun hobby and don't feel like I need to count that as an expense. Finally, I just really like how this came out. It looks really cool and I feel happy every time I pass by it in the living room, even though there's hardly any room for it. It looks like something I'd buy from a store. So I'm starting the price at $200! That's definitely on the high side compared to other postings on Facebook marketplace, but this is in like-new condition, unlike most other listings on there. I'm also not in a rush to get it out of the house anymore, and besides, you can always lower the price once it's posted, but you can't raise it ;) I'm really interested to see if this gets any interest, and at what price I ultimately end up selling it at. Maybe with the profit I'll buy a paint sprayer for my next project :)
Know someone looking to buy a coffee table?? Here's my listings:


Comments
Post a Comment