Refurbishing a junky dresser
Well, this one took longer than expected. This dresser was in really poor shape when I picked it up from the curb, and ended up being mostly a repair job. It was a lot of work, but it's really satisfying to see everything in good shape now, when it truly was in trash condition when I found it.

I found this dresser on Nextdoor, listed for free, and was immediately drawn to the curvy lines in the front and the unique hardware. It was listed as "free on curb" almost a week prior, so I figured it would be long gone already, but I messaged the person anyway. I was super surprised when they told me it was still out on the curb. It's pretty cool looking, and stuff usually gets snatched from the curb around here.

The first issue was the barely-attached top. There was a clear gap through which you could see the fasteners that were trying to cling onto the wood.


The top surface was pretty clearly laminated particleboard, and it too was starting to detach.

I pulled the whole top piece off with the help of a hammer to take it out of its misery. It's a solid wood frame with a thin piece of laminated particleboard on top.

The lifting particleboard was pretty easy to repair. I glued the corner back to the frame using some wood glue, and put some weights on it while it dried to press the two layers together.
Once I had the top off, I could tell that the dresser was mainly held together with giant staples! 😱

Not only that, but the frame itself was starting to come apart. It wasn't even flat anymore, and half-attached staples were everywhere.

Then it was time to reattach the top to the dresser. This part is really important because pretty much the only way to pick up this dresser is to grab it by the top -- so every time the dresser moves, its whole weight is being held by this attachment point. I tried to screw it in from the bottom so that you wouldn't see any hardware on top, but the angles were all too awkward for my drill. So I ended up using Liquid Nails instead!
Liquid nails is like a caulk / super glue hybrid. The top piece makes lots of contact with the rest of the dresser frame when it's in place, so there's plenty of surface area to apply the glue. This was my first time using liquid nails, and I was a little skeptical, but it is contractor-grade stuff. It takes 24 hours to dry, and I let it sit even longer just in case.
Surprise, it worked! It actually worked really well! Isaac and I could lift the dresser by the top and it was solid. I'm impressed, liquid nails. Good job.
Next up, the drawer rails. There's a single bottom-mount wood rail for each drawer. And surprise, they were also attached via staples, and they also came undone. Half of the rails looked like this:

And one even looked like this, with the wood lip nearly completely gone:

While I was at it, I also applied some homemade furniture wax to the rails, to help the drawers glide over them better.

There was no saving this piece of plastic, so I needed to find a new one. I looked on Amazon, but you have to be really careful to get the right size guide for your rail. I learned that the hard way before. I didn't see anything that was a perfect fit, but that's when I realized Isaac can 3D print one!


Since I was now dealing with exposed particleboard, I had to seal it so it wouldn't get wet again. I put down two coats of an oil-based primer (not water-based!). The primer also has the benefit of unifying the texture of the two different types of materials, so that everything looks even when you paint over it. I did the rest of the dresser in water-based primer, because water-based products don't smell so bad, and are a lot easier to clean out of your brushes and rollers. Primer helps paint stick to the otherwise slippery laminate. It also provide a nice white base coat for your paint. Primer is cheaper than paint, so if by priming you end up needing less coats of paint to get full coverage, that's a win.


At first I tried washing the hardware to brighten it up and make it shiny. I soaked it in hot water + white vinegar for several hours and went at it with a stiff bristled brush. This was stupid. The gold was just a thin layer of color over some very ordinary, ugly looking metal. Washing and scrubbing didn't help at all.


It's amazing how much of a difference some good staging makes. I went from feeling lukewarm to pretty proud of this piece and excited to list it! It looks so much better with some good lighting and in my brightened-up staging area.
This one was kind of funny: one of the drawer bottoms was starting to get detached, also due to staples pulling out. Someone had clearly tried to hold it together with duct tape and did not succeed much. This also must have happened a long time ago, because the tape felt like paper and came right off when I pulled it. I fixed that with some new nails as well. Honestly, I wonder how many staples were used to make this dresser.

Okay, next. See that white piece of plastic on the back of the drawer? That's what keeps the drawer attached to the rail underneath. That way, when you open a drawer, the front doesn't tip down and dump all your stuff. Surprise, these were also attached via staples.

One drawer had this piece completely snapped off. So whenever I pulled the drawer, it would immediately tip out. The rail and the plastic guide are the sole things keeping the drawer level when it pulls out, so there's some significant force on the plastic part when the drawer is all the way open with stuff inside. The front of the drawer is trying to go down due to gravity, and the plastic guide is holding on for dear life to the wood rail at the back. Also explains why a bunch of the wood rails got pulled up.


Boom, a perfectly sized, brand new drawer guide. With screw holes!
I was a little silly though and didn't consider that the drawer back isn't that thick and the screws would go all the way through and poke out inside the drawer. They're sharp so I definitely had to cover that. I cut out a small piece of scrap wood and added it to the back to cover the sharp screw ends. Since it's all the way in the back of the drawer, it's thankfully not that noticeable.

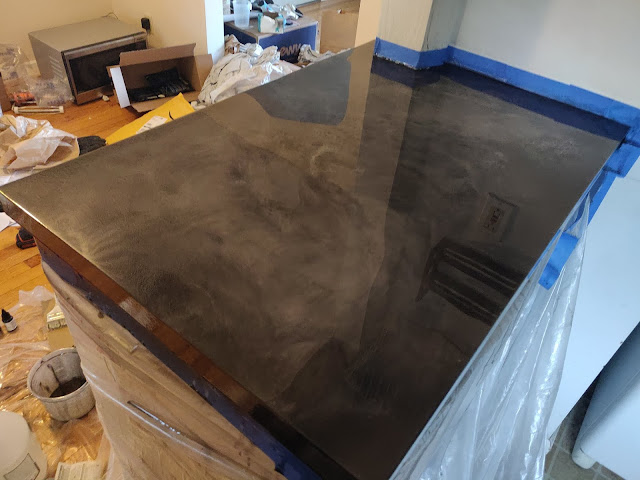
Next issue: laminate bubbles. Like I said, the top surface is particleboard with a plastic laminate. I'm pretty sure this dresser had caught some rain while it was out on the curb, so the top surface was pretty ugly. Somehow, some water had gotten through the laminate and into the particleboard, where the material swelled up, forming a raised lump on the top surface. This wasn't just a few bumps -- running my hand across the top, the whole surface felt rough with little bumps. I sanded the whole thing down with the lowest grit sandpaper I had to try to get things level. Below, all the brown spots are areas that were raised due to swelling. The laminate on those parts got completely sanded off because they were bumped out. The shorter bumps are the darker marks everywhere, where the laminate was only partially sanded off.

A ton of sanding later, here's what it looked like. Note how there's a lot of brown spots. That's a lot of water damage.

Since I was now dealing with exposed particleboard, I had to seal it so it wouldn't get wet again. I put down two coats of an oil-based primer (not water-based!). The primer also has the benefit of unifying the texture of the two different types of materials, so that everything looks even when you paint over it. I did the rest of the dresser in water-based primer, because water-based products don't smell so bad, and are a lot easier to clean out of your brushes and rollers. Primer helps paint stick to the otherwise slippery laminate. It also provide a nice white base coat for your paint. Primer is cheaper than paint, so if by priming you end up needing less coats of paint to get full coverage, that's a win.

The hardware needed work too. It was super pretty, but looked a little worn. I wanted to make it shiny gold again.

I ended up buying some metallic gold paint and hand-painting each handle back to new. Spray paint would have been easier, but the paint store near me didn't have metallic spray paint, and you can't get that shipped either.

For the color of the rest of the dresser, I was initially thinking a sage-green color to compliment the gold hardware. However, I'm generally not very adventurous with color. I started to veer toward more neutral colors: light grey, or what about black or navy blue? It's a big piece and the color choice felt like a significant decision. I ended up asking on instagram and one of my friends suggested sage green. This confirmed my first instinct, so I figured I should do it. I tried to pick a green that was still neutral so it would easily work in anyone's room, and ended up choosing Silver Sage by House & Canvas.
Even with two coats of white primer, I still needed three coats of paint to get full coverage. This is why I like painting with dark colors! I wonder if I would have needed fewer coats if I applied the paint using a brush instead of a roller. I tend to be really stingy with paint when I'm using a roller. But I was worried about brush strokes on such a large piece. On the bright side, I did end up with a nice smooth texture when it was all done.

I finished it out with a satin polycrylic top coat for protection -- three coats on top, and two coats everywhere else. I applied it with a brush and was super pleased that I didn't end up with any visible brush strokes (compared to my previous piece). It was pretty cold in the garage, so maybe that slowed the dry time of the polycrylic and allowed it to self level a bit.
Oops, one more thing. I forgot to take pictures of this, but the inside of the drawers looked terrible. There were big dark stains in pretty much every drawer -- how do you even get stains inside a dresser?? The papery drawer liners were not removable, and the drawer bottoms were cheap engineered wood anyway. I had to buy some new drawer liners, which can actually be a pretty significant expense. I picked a really plain one, so it was a little cheaper.
The dresser was finally finished, but I was still feeling iffy about it. I still doubted the color choice, and I wasn't sure if it looked too plain with such a big piece all in the same color. I like having some wood tones in furniture, but because of the particleboard, the only place to have exposed wood here would have been the drawer fronts, which would have distracted from the gold hardware.
New problem. Unlike the coffee table that I did before, this was a big, heavy piece, and not something I could easily bring up the stairs and stage inside the house for photos. As you can see from the picture above, my garage is not the most attractive place. The walls are plywood, and the floor is concrete with a smattering of gravel.
There's a lot of things I want to improve about the garage. It's cold. There's only one light and outlet. (And the light is in the corner, where it casts shadows all over the place. I usually try to work during the day with the garage door open so I can actually see, but on weeknights after work I have to deal with the poor lighting.) The floor isn't level, and it's dirty. In an ideal world, I would completely renovate the garage. But I don't have the time, money, or willingness to move all my hoarded furniture somewhere else in the mean time.
As a quick fix, I painted the walls white to make it look more like a real room and less like a plywood shack. When Isaac and I first moved in, we grossly overestimated how much paint we needed to paint some rooms, and got way too much white paint, so I just used that.
For the ground, I used some big pieces of plywood we had picked up from someone who was clearing out their garage a while back. Apparently it used to be a giant storage chest. It's not exactly hardwood flooring, but it looks more homey than concrete and gravel.

So here's my little staging section of the garage now. I don't have a ton of plywood or room to make the area bigger, so it doesn't totally fill up the field of view when I take pictures of the dresser. But with the garage door open and some good natural light, it doesn't look half bad:


You can see all my furniture for sale on my brand new shop website: http://redkitefurniture.crevado.com/
UPDATE: It sold!! Posted on Friday night and sold on Sunday morning :) This is my first sale and I'm so excited! One more sale and I'll have covered all my initial expenses over all my projects (materials, tools etc), and will be in the green. The customer was really happy and said she's let her mom know about me, since she has lots of old furniture to get rid of. And now I finally have a little breathing room in the garage to work on more things!
I lowballed myself with the price at first, but Isaac convinced me to list it a little higher. He was right :)
Also, the person I picked the dresser up from recognized it on my marketplace listing, and was really impressed with the transformation! Feels great to have saved it from the dump.

Comments
Post a Comment